This software only supports Windows 10/11 on real machines. It may not work on older Windows or virtual environments such as Wine or Virtual Box.
If you have any problems or requests, please post them to GitHub Issues.
Installation
-
Install win-vind using your preferred installation method from the Downloads page. Note that the installation path and configuration file path will vary according to the installation method.
-
To run win-vind, please execute
$win-vind.exefrom the command line or click on the app icon. -
If you can see the icon in the system tray, it is working properly.

Like this
How to terminate win-vind
:exitis the recommended termination.<F8> + <F9>is safe forced termination.
Note: win-vind could NOT operate some windows given high-rank authorization than itself. For example, if you start Task Manager having the highest authorization and select its window, you cannot move, click or scroll the mouse cursor by win-vind. If you want to operate all windows, it is recommended that win-vind be given administrator authorization using Task Scheduler.
Mode transition concept
As in Vim, there is the concept of modes, such as normal mode or insert mode. Since Vim only works with text, one normal mode and one visual mode are sufficient. However, since GUI has two types of operation targets, the mouse and text caret, win-vind has two normal modes and two visual modes.
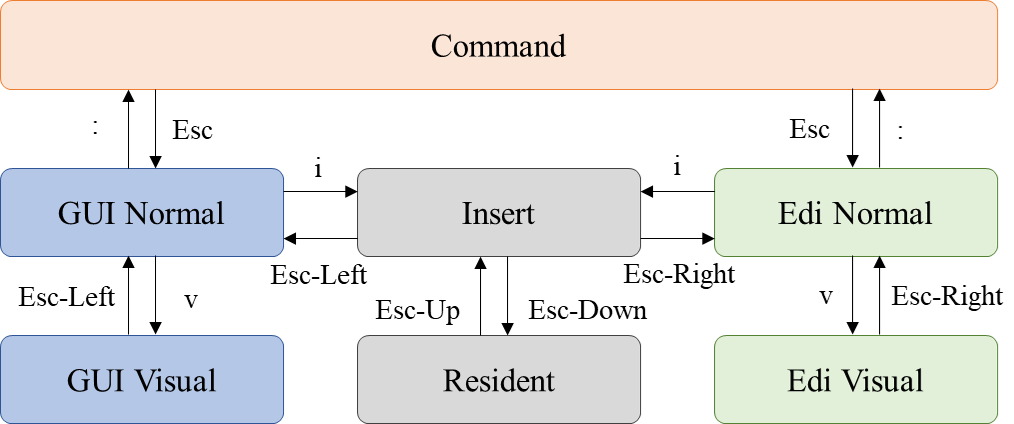
Default mode layer overview
These normal and visual modes are classified into two groups: the GUI group and the Editor group. The GUI group is a family of mouse cursor functions that comprehensively handles not only mouse cursors but also GUIs that can be manipulated by mouse cursors, such as windows. The Editor group is a family of functions specialized for text editing, which uses carets to perform Vim emulation to achieve a Vim everywhere.
Concepts of GUI Mode and Editor Mode
As a new mode concept, win-vind has Resident mode, which is substantially off-mode. Since win-vind targets Windows as a whole, it must coexist with software that uses keyboard shortcuts, such as Vim, and applications that require real-time performance, such as games (in some cases, keyboard emulation is cheating). Resident mode is an evacuation mode that turns off win-vind itself to avoid such collision problems, providing only the minimum necessary mappings by default.
Mode is only a binding preset, but all modes except insert and resident block all keyboard messages and route them within win-vind. This input key absorption feature allows us to freely define mappings without having to consider conflicts with Windows hotkeys or other application shortcut keys, in contrast to conventional binding tools.

The following table shows a comparison between modes.
| Mode | Key Message Blocking | Roles |
|---|---|---|
| GUI Normal | ✓ | Control windows and mouse cursor. The default bindings are <esc>-left> or <ctrl-]>. |
| GUI Visual | ✓ | Select GUI objects such as icons by holding down the left mouse button. The default binding is v in GUI Normal mode. |
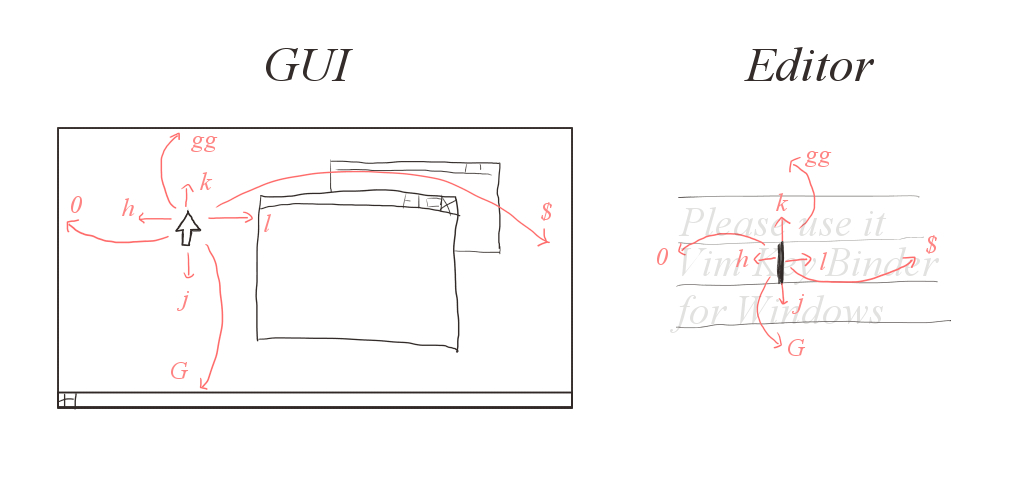
| Edi Normal | ✓ | Emulate Vim in input forms of web pages, Microsoft Office Word, etc. The default bindings are <esc-right> or <ctrl-[>. |
| Edi Visual | ✓ | Select text as in Vim. The default binding is v in Edi Normal mode. |
| Insert | ✘ | Input texts as normal Windows without absorbing key messages. The default binding is i. |
| Resident | ✘ | Resident mode is an evacuation mode to prevent bindings from collisions with shortcut keys while gaming on Steam or using Vim. The default binding is <esc-down>. |
| Command | ✓ | Execute commands visually using a Vim-like virtual command line that is overlaid on the screen. The default binding is :. |
The initial startup mode can be changed with initmode option using the mode prefix. An example of setting the initial mode to GUI Normal is as follows.
" write this run command into .vindrc.
set initmode = gn
Customization
Change parameters and options
You can change the options and parameters specified using the set command in your .vindrc. All options are on the cheat sheet.
You can also try setting :set cursor_accel=32 in Command mode, in which case it will be reset after restart and not saved.

Try options via the virtual command line
The following is a list of syntaxes.
| Syntax | Effects |
|---|---|
set ${OPTION_NAME} |
Set the value of the option to true. |
set no${OPTION_NAME} |
Set the value of the option to false. |
set ${OPTION_NAME} = ${VALUE} |
Set a value of the option. The value can be a string or a number that allows floating points. The string does not need quotation marks, and any character after the non-white character will be handled as the value. White spaces at both ends of the equals sign are ignored. |
For example, adjusting EasyClick parameters.
" write in your .vindrc
set easyclick_bgcolor=E67E22
set easyclick_fontcolor=34495E
set easyclick_fontname=Consolas
set easyclick_fontsize=16
set easyclick_fontweight=600
Change bindings or define macros
win-vind uses Run Commands style configuration method. If you’ve ever written a .vimrc, it’s easy to make it your win-vind.
Warning: win-vind v5 has made fundamental changes to the mapping system, please see the migration guide from <= 4.4.0.
What is a mapping?
A typical key binding is a simple one that assigns a function from a set of keys. In contrast, the mapping employed in Vim is a kind of extension of key binding, a mechanism that allows recursive key assignment and command definition.
Mapping is defined using a variety of map commands known in Vim. The most commonly used are:
mapremaps for all modesnmap/noremapremaps for normal modeimap/inoremapremaps for insert mode
Below is a table listing the complete set of commands for editing mappings.
| Syntax | Features |
|---|---|
${MODE}map ${IN_CMD} ${OUT_CMD} |
Recursively define a map that is invoked by ${IN_CMD} and generates ${OUT_CMD}. |
${MODE}noremap ${IN_CMD} ${OUT_CMD} |
Non-recursively define a map that is invoked by ${IN_CMD} and generates ${OUT_CMD}, which is composed by the default map. |
${MODE}unmap ${IN_CMD} |
Remove the map corresponding to the ${IN_CMD}. |
${MODE}mapclear |
Delete all maps. |
command ${IN_CMD} ${OUT_CMD} |
It defines the command to call the ${OUT_CMD}. |
delcommand ${IN_CMD} |
Remove the command corresponding to the {IN_CMD}. |
comclear |
Delete all commands. |
${MODE} is the Mode Prefix. The keyset syntax uses the same expression as in Vim, where keys are connected by - between < and >. However, there is no limit to the number of combinations, and you can connect as many as you like. (e.g. <Esc-b-c-a-d>).
Examples of recursive key assignments are shown below.
" Mapping A
nmap b h
nmap o b
nmap p o
" Mapping B
nmap b h
nmap o h
nmap p h
Mapping A is defined as b -> h, o -> b, p -> o. However, the map command performs a recursive assignment, o -> b -> h, p -> o -> b -> h, and automatically generates an optimized mapping B. This allows simple commands to be combined to form complex commands efficiently.
On the other hand, the noremap command does not perform such recursive resolution. That is, the mapping destination is always interpreted as the default binding, and mapping to a nonexistent binding makes no sense.
For example, the following mapping does not cause anything to happen in insert mode because it is not binding to the m key by default.
" m does not exist, so nothing happens
inoremap g m
Allow external macro
As mentioned earlier, some modes of win-vind absorb keystrokes and do not propagate them to other applications. Therefore, there is a special feature called external macro.
The external macro is defined macros that are propagated outside of win-vind by enclosing them in { and }. This emulates the action of the user pressing the keyboard itself. A single key to single key mapping (e.g. map a {b}) is the most efficient low-level mapping done.
Examples
Below are some examples of use.
- Define mode change mapping
imap <win-]> <to_gui_normal> - Text input macros
nmap mail {win-vind@example.com} - Web page launcher
nmap <ctrl-1> :e https://example.com<cr> - Application launcher
nmap <ctrl-2> :! notepad<cr> - Copy the current line to the bottom line as in Vim.
enmap t yyGp
Automatic command
win-vind can be configured to automatically execute commands for specific events and target filenames using the autocmd command.
Examples
- Default mapping for the specific event (match any applications)
autocmd AppLeave * <to_insert> - Once notepad is selected, it will automatically switch to Editor normal mode.
"Equivalent to conventional dedicate_to_window autocmd AppEnter */microsoft*/notepad.exe <to_edi_normal> - Suppress win-vind in processes named Vim.
" Equivalent to conventional suppress_for_vim
autocmd AppEnter,EdiNormalEnter vim.exe <to_resident>
See <autocmd_add> or <autocmd_del> for more details.
More advanced features
Load remote .vindrc
Inspired by many Vim plugin managers such as vim-plug, win-vind has a simple remote .vindrc loading capability using the source command.
The source command is originally designed to load local .vindrc, but it can also load .vindrc in the form user/repo from the root directory of a repository on GitHub.
As a sample, by writing the following in your .vindrc., win-vind loads the .vindrc in pit-ray/remote_vindrc_demo repository, and :test_remote command can be available.
" Load remote repository .vindrc
source pit-ray/remote_vindrc_demo
Warning:
source user/repodoes not verify the safety of the .vindrc it reads, which may be a security hole. Therefore, use it for reliable repositories or your own dotfiles configurations. As a minimum security measure, win-vind only reads the contents of source the first time asourcecommand is done, and does not update the contents asgit pulldoes.
Use as UI automation command by server-client
The --command option allows us to execute an arbitrary command from a terminal.
The first time you run win-vind, it will be resident in the system tray and run as a server program. The server will check shared memory at the interval specified by the listen_interval option and execute any requested commands in addition to the query. All new win-vinds that already have win-vind running will become clients.
For example, if you execute the following command with win-vind already running, a window-switching program will be started.
$ win-vind -c "<switch_window>"
By using this, only specific functions such as EasyClick can be called from other tools such as AutoHotKey.
Quick Tutorial
In the following, let’s try win-vind in practice based on a concrete example.
1. GUI Operation and Window Operation
- Switch to GUI Normal Mode with
<ctrl-]>. - Please inputs
:!mspaintto launch Microsoft Paint. -
You can call EasyClick with
<shift-f><shift-f>.
EasyClick Demo
- Let’s key to return to insert mode. select windows with
<C-w>hor<C-w>l. - Please select Microsoft Paint and close it with
:close.
2. Customize win-vind
Let’s do the last tutorial!
- Go to GUI Normal mode.
-
Open your
.vindrcwith:e.
Edit .vindrc Demo
-
Write the following commands into
.vindrc." Write to your .vindrc. set cmd_fontname = Arial inoremap <ctrl-shift-f> <easyclick><click_left> inoremap <ctrl-shift-s> <switch_window><easyclick><click_left> noremap <ctrl-1> :!notepad<cr> -
If you are done, try reloading
.vindrcwith:sourceof win-vind. (No arguments are needed.)
Reload Demo
-
Now make sure you are in GUI Normal mode and press Ctrl + 1 to launch Notepad.
-
Press the i key to return to Insert mode.
- You can use EasyClick by pressing Ctrl + Shift + f and switching windows with EasyClick by pressing Ctrl + Shift + s.