- Mode
- System Command
- Mouse
<click_left><click_right><click_mid><move_cursor_left><move_cursor_right><move_cursor_up><move_cursor_down><easyclick><easyclick_all><gridmove><focus_textarea><jump_cursor_to_left><jump_cursor_to_right><jump_cursor_to_top><jump_cursor_to_bottom><jump_cursor_to_hcenter><jump_cursor_to_vcenter><jump_cursor_to_active_window><jump_cursor_with_keybrd_layout><scroll_up><scroll_up_halfpage><scroll_up_onepage><scroll_down><scroll_down_halfpage><scroll_down_onepage><scroll_left><scroll_left_halfpage><scroll_right><scroll_right_halfpage>
- Window
<window_resizer><switch_window><select_left_window><select_right_window><select_upper_window><select_lower_window><move_window_left><move_window_right><move_window_up><move_window_down><maximize_current_window><minimize_current_window><resize_window_width><increase_window_width><decrease_window_width><resize_window_height><increase_window_height><decrease_window_height><arrange_windows><exchange_window_with_nearest><rotate_windows><rotate_windows_in_reverse><snap_current_window_to_left><snap_current_window_to_right><snap_current_window_to_top><snap_current_window_to_bottom><open_new_window><reload_current_window><open_new_window_with_hsplit><open_new_window_with_vsplit><close_current_window>
- Process
- Vim Emulation
<to_insert_BOL><to_insert_EOL><to_insert_append><to_insert_nlabove><to_insert_nlbelow><move_caret_left><move_caret_down><move_caret_up><move_caret_right><move_fwd_word><move_fwd_word_simple><move_bck_word><move_bck_word_simple><move_fwd_bigword><move_bck_bigword><move_end_word><move_end_bigword><move_bckend_word><move_bckend_bigword><jump_caret_to_BOF><jump_caret_to_BOL><jump_caret_to_EOF><jump_caret_to_EOL><change_char><change_highlight_text><change_line><change_until_EOL><change_with_motion><delete_after><delete_before><delete_highlight_text><delete_line><delete_line_until_EOL><delete_with_motion><join_next_line><put_after><put_before><repeat_last_change><replace_char><replace_sequence><switch_char_case><yank_highlight_text><yank_line><yank_with_motion>
- Hotkey
- Virtual Desktop
- Tab
- File
Mode
<to_command>
Enter the command mode, which is generally called with :.
In the command mode, the typed characters are displayed on the virtual command line.
You can operate the virtual command line as shown in the following table.
| Key | Operation |
|---|---|
<enter> |
Execute the current command |
<bs> |
Delete characters |
<up> |
Backward history |
<down> |
Forward history |
<tab> |
Complete commands |

Example: Change options via the virtual command line
Related Options
- vcmdline
- cmd_bgcolor
- cmd_fontcolor
- cmd_fontname
- cmd_fontsize
- cmd_fontweight
- cmd_fontextra
- cmd_roughpos
- cmd_xmargin
- cmd_ymargin
- cmd_fadeout
- cmd_monitor
See Also
<to_gui_normal>
Transition to GUI normal mode. In GUI normal mode, the typed keys are not transmitted to Windows, so you can create any mapping you like without considering shortcut key conflicts.
See Also
<to_gui_visual>
Enter GUI visual mode. In this mode, the mouse is always in the click state and input is blocked from Windows as in normal mode.
See Also
<to_edi_normal>
Switch to the editor normal mode. This mode is essentially the same as GUI normal mode, but defines a lot of text-specific mappings that emulate Vim editing in order to achieve Vim everywhere.
See Also
<to_edi_visual>
Switch to editor visual mode. The editor visual mode corresponds to the “v” command in Vim, which allows you to make a character-based selection with the keyboard. The typed keys are not propagated to Windows. To select a line, call <to_edi_visual_line> instead. In both ways, the only difference is the initialization, and the transition destination is the editor visual mode.
See Also
<to_edi_visual_line>
Switch to editor visual mode.
Similar to <s-v> of Vim, the selection method is line selection. If you want to do character selection, call <to_edi_visual> instead.
See Also
<to_insert>
Enters the Insert mode. In this mode, you can directly input and edit text.
See Also
<to_resident>
Enters Resident mode.
See Also
<to_instant_gui_normal>
Temporarily switches to GUI Normal mode and performs matching, which can be used as a map-leader.
See Also
System Command
<set>
Change the options and parameters specified using the set command in your .vindrc.
Change parameters via the virtual command line
| Syntax | Effects |
|---|---|
set ${OPTION_NAME} |
Set the value of the option to true. |
set no${OPTION_NAME} |
Set the value of the option to false. |
set ${OPTION_NAME} = ${VALUE} |
Set a value of the option. The value can be a string or a number that allows floating points. The string does not need quotation marks, and any character after the non-white character will be handled as the value. White spaces at both ends of the equals sign are ignored. |
See Also
<source>
Load the .vindrc file.
Inspired by many Vim plugin managers such as vim-plug, win-vind has a simple remote .vindrc loading capability using the source command.
The source command is originally designed to load local .vindrc, but it can also load .vindrc in the form user/repo from the root directory of a repository on GitHub.
As a sample, by writing the following in your .vindrc., win-vind loads the .vindrc in pit-ray/remote_vindrc_demo repository, and :test_remote command can be available.
" Load remote repository .vindrc
source pit-ray/remote_vindrc_demo
Warning:
source user/repodoes not verify the safety of the .vindrc it reads, which may be a security hole. Therefore, use it for reliable repositories or your own dotfiles configurations. As a minimum security measure, win-vind only reads the contents of source the first time asourcecommand is done, and does not update the contents asgit pulldoes.
See Also
<map>
Recursively define a map that is invoked by ${IN_CMD} and generates ${OUT_CMD}.
${MODE}map ${IN_CMD} ${OUT_CMD}
${MODE} is the Mode Prefix.
The map allows remapping with user-defined mapping like the following.
nmap f h  " f --> h
nmap t f  " t --> h
The noremap performs only the default map.
nnoremap f h  " f --> h
nnoremap t f  " t --> f
See Also
<noremap>
Non-recursively define a map that is invoked by ${IN_CMD} and generates ${OUT_CMD}, which is composed by the default map.
" Call in .vindrc
${MODE}noremap ${IN_CMD} ${OUT_CMD}
${MODE} is the Mode Prefix.
See Also
<unmap>
Remove the map corresponding to the ${IN_CMD}.
${MODE}unmap ${IN_CMD}
${MODE} is the Mode Prefix.
See Also
<mapclear>
Delete all maps.
${MODE}mapclear
${MODE} is the Mode Prefix.
See Also
<command>
It defines the command to call the ${OUT_CMD}.
command ${IN_CMD} ${OUT_CMD}
${MODE} is the Mode Prefix.
See Also
<delcommand>
Remove the command corresponding to the {IN_CMD}.
delcommand ${IN_CMD}
${MODE} is the Mode Prefix.
See Also
<comclear>
System Command comclear. Delete all commands
comclear
See Also
<autocmd_add>
Syntax
autocmd {event} {aupat} {cmd}
It adds {cmd} into autocmd list for {aupat}, autocmd pattern, corresponding to {event}.
As such as Vim, this function append {cmd} into a list rather than overwriting it even if the same {cmd} has already existed in a list.
The rule of {aupat} is based on the original Vim.
The registered {cmd}s will execute in the order added.
Event
The following table shows the supported events. The string of each event is NOT case-sensitive.
| Event | When does it ignite? |
|---|---|
| AppEnter | Select an application |
| AppLeave | Unselect an application |
| GUINormalEnter | Enter to the GUI normal mode |
| GUINormalLeave | Leave from the GUI normal mode |
| GUIVisualEnter | Enter to the GUI visual mode |
| GUIVisualLeave | Leave from the GUI visual mode |
| EdiNormalEnter | Enter to the editor normal mode |
| EdiNormalLeave | Leave from the editor normal mode |
| EdiVisualEnter | Enter to the editor visual mode |
| EdiVisualLeave | Leave from the editor visual mode |
| InsertEnter | Enter to the insert mode |
| InsertLeave | Leave from the insert mode |
| ResidentEnter | Enter to the resident mode |
| ResidentLeave | Leave from the resident mode |
| CmdLineEnter | Enter to the command mode |
| CmdLineLeave | Leave from the command mode |
The event does not allow us to use *.
If you want to add a command to multiple events at the same time, , without after-space is available.
Pattern
If the pattern contains /, it matches the absolute path of the executable file of the application which creates each event.
If it does not contain /, it is compared against the name of the executable file.
The pattern is NOT case-sensitive.
| Pattern | Interpretation |
|---|---|
* |
Matches any character |
? |
Matches any single character |
\? |
Matches the ? character |
. |
Matches the . character |
~ |
Matches the ~ character |
All path delimiters \ in Windows are treated as / in pattern translation.
If you want to add a command to multiple patterns at the same time, , without after-space is available.
All others follow the general regex.
Examples
" Default mapping (match any applications)
autocmd AppLeave * <to_insert>

" Limited mapping (match specific application)
autocmd AppEnter *notepad* <to_edi_normal>
autocmd AppEnter,EdiNormalEnter vim.exe <to_resident>
autocmd AppEnter C:/*/Zotero/zotero.exe <to_edi_normal>
See Also
<autocmd_del>
Syntax
autocmd! {event} {aupat} {cmd}
It remove all autocmd matched {event} and {aupat}, then register {cmd} after delete.
The following syntaxes are available.
autocmd! {event} {aupat} {cmd}
autocmd! {event} {aupat}
autocmd! * {aupat}
autocmd! {event}
Each features are the same as the original Vim.
Examples
autocmd! * *vim*  " Remove all events having the pattern *vim*
autocmd! AppLeave *notepad* <to_insert>  " Remove old events and add a new event
See Also
Mouse
<click_left>
Left button of a mouse click.
See Also
<click_right>
Right button of a mouse click.
See Also
<click_mid>
Middle button of a mouse click.
See Also
<move_cursor_left>
Move the mouse cursor to the left.
See Also
<move_cursor_right>
Move the mouse cursor to the right.
See Also
<move_cursor_up>
Move the mouse cursor up.
See Also
<move_cursor_down>
Move the mouse cursor down.
See Also
<easyclick>
Move a cursor using hints on the UI objects without clicking.
Note: In versions prior to 5.1.0, there where commands
<easy_click_left>,<easy_click_right>,<easy_click_mid>, and<easy_click_hover>, which have been merged into<easyclick>. For compatibility, the previous commands are automatically replaced by the following.
Conventional Name Automatically Replaced Name <easy_click_left><easyclick><click_left><easy_click_right><easyclick><click_right><easy_click_mid><easyclick><click_mid><easy_click_hover><easyclick>
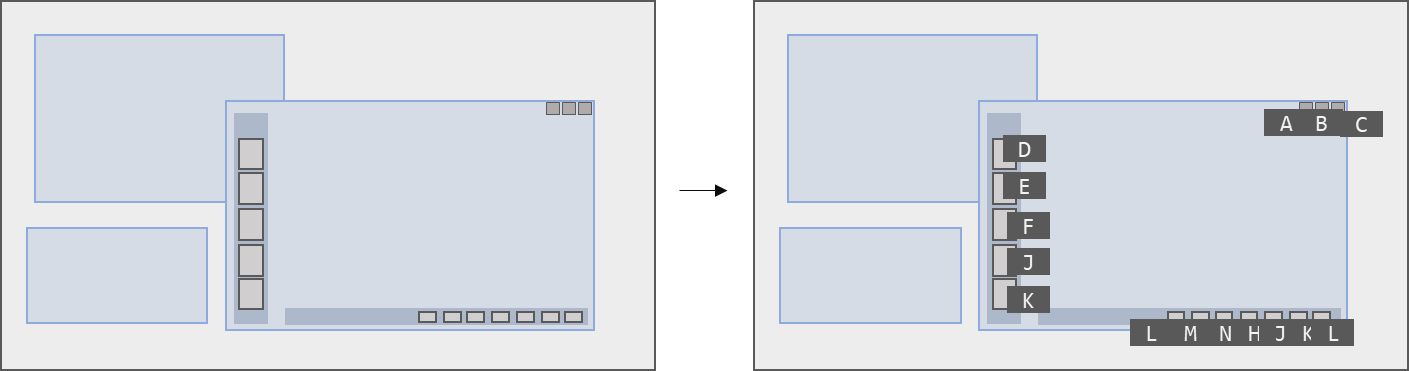
Move a cursor using hints.
See Also
- <gridmove>
- <click_left>
- <click_right>
- <click_mid>
- <jump_cursor_to_active_window>
- <jump_cursor_with_keybrd_layout>
<easyclick_all>
This function is the <easyclick> to work on all visible applications even if they are not in focus.
See Also
<gridmove>
Move a cursor using tiled hints laid on the entire screen.
To change fonts or colors, you can set the several options, such as gridmove_bgcolor, gridmove_fontcolor, gridmove_fontname, gridmove_fontsize, and gridmove_fontweight.
In order to change the grid size, set the size with gridmove_size option. It assumes a text as its value, such as 12x8 for horizontal 12 cells and vertical 8 cells.
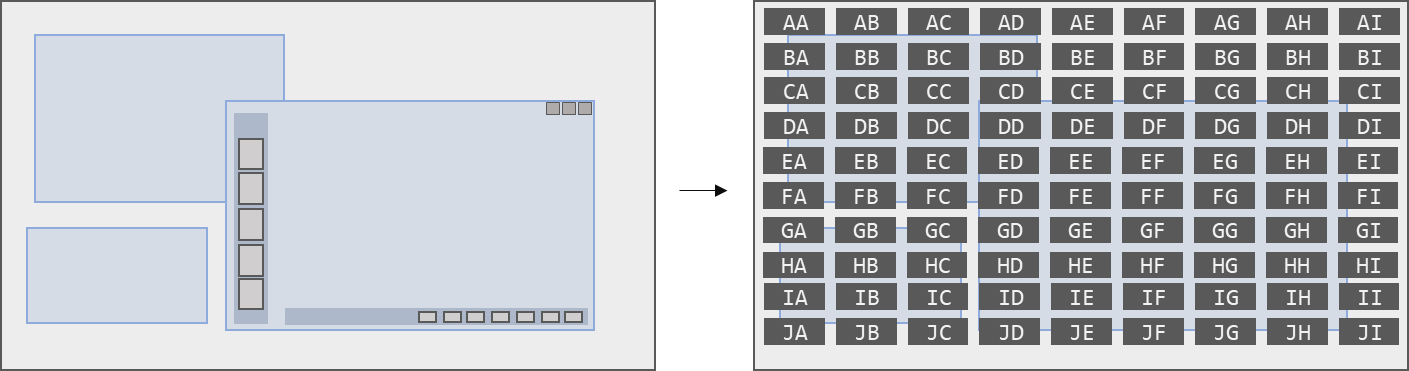
Move a cursor using tiled hints.
See Also
- <easyclick>
- <click_left>
- <click_right>
- <click_mid>
- <jump_cursor_to_active_window>
- <jump_cursor_with_keybrd_layout>
<focus_textarea>
Select the text area closest to the cursor and move the mouse cursor over it. If there are multiple text areas, the selection is based on the minimum Euclidean distance between the mouse cursor and the center point of the bounding box of the text area.
In the previous version of win-vind, this function was attached to the Editor Normal Mode as the autofocus_textarea option, but it is now independent. Currently, the autofocus_textarea option is deprecated. For compatibility, autofocus_textarea defines a mapping such as autocmd EdiNormalEnter * <focus_textarea>.
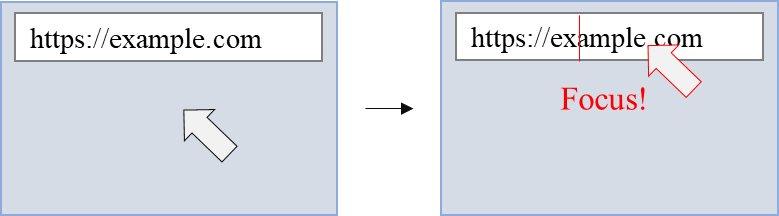
Focus the nearest text area and move the cursor.
<jump_cursor_to_left>
Jump the mouse cursor to the left.
See Also
- <jump_cursor_to_right>
- <jump_cursor_to_top>
- <jump_cursor_to_bottom>
- <jump_cursor_to_hcenter>
- <jump_cursor_to_vcenter>
<jump_cursor_to_right>
Jump the mouse cursor to the right.
See Also
- <jump_cursor_to_left>
- <jump_cursor_to_top>
- <jump_cursor_to_bottom>
- <jump_cursor_to_hcenter>
- <jump_cursor_to_vcenter>
<jump_cursor_to_top>
Jump the mouse cursor to the top.
See Also
- <jump_cursor_to_left>
- <jump_cursor_to_right>
- <jump_cursor_to_bottom>
- <jump_cursor_to_hcenter>
- <jump_cursor_to_vcenter>
<jump_cursor_to_bottom>
Jump the mouse cursor to the bottom.
See Also
- <jump_cursor_to_left>
- <jump_cursor_to_right>
- <jump_cursor_to_top>
- <jump_cursor_to_hcenter>
- <jump_cursor_to_vcenter>
<jump_cursor_to_hcenter>
Jump the mouse cursor to the horizontal center.
See Also
- <jump_cursor_to_left>
- <jump_cursor_to_right>
- <jump_cursor_to_top>
- <jump_cursor_to_bottom>
- <jump_cursor_to_vcenter>
<jump_cursor_to_vcenter>
Jump the mouse cursor to the vertical center.
See Also
- <jump_cursor_to_left>
- <jump_cursor_to_right>
- <jump_cursor_to_top>
- <jump_cursor_to_bottom>
- <jump_cursor_to_hcenter>
<jump_cursor_to_active_window>
Jump the mouse cursor to the foreground window.
See Also
<jump_cursor_with_keybrd_layout>
Jump the mouse cursor by keyboard mapping.
See Also
<scroll_up>
Scroll the mouse wheel up.
See Also
<scroll_up_halfpage>
Scroll the mouse wheel up with a half page.
See Also
<scroll_up_onepage>
Scroll the mouse wheel up with a page.
See Also
<scroll_down>
Scroll the mouse wheel down.
See Also
<scroll_down_halfpage>
Scroll the mouse wheel down with a half page.
See Also
<scroll_down_onepage>
Scroll the mouse wheel down with a page.
See Also
<scroll_left>
Scroll the mouse wheel left.
See Also
<scroll_left_halfpage>
Scroll the mouse wheel left with a half page.
See Also
<scroll_right>
Scroll the mouse wheel right.
See Also
<scroll_right_halfpage>
Scroll the mouse wheel right with a half page.
See Also
Window
<window_resizer>
Start window resizer. It respects Vim plugin simeji/winresizer.
See Also
<switch_window>
Switch a window.
See Also
<select_left_window>
Select the left window.
See Also
<select_right_window>
Select the right window.
See Also
<select_upper_window>
Select the upper window.
See Also
<select_lower_window>
Select the lower window.
See Also
<move_window_left>
Moves the selected widow to the left.
The amount of window movement is based on the window_velocity parameter as in window_resizer.
If a number is entered before the command, such as 20<c-w><c-h>, the window will be moved by 20 * window_velocity.
The window can only be moved as far as it is visible on the screen. Therefore, excessive movement will cause the window to stop at the edge of the screen. If you are using multiple displays, the movement range is determined by the combined resolution of all displays.
See Also
<move_window_right>
Moves the selected widow to the right.
The amount of window movement is based on the window_velocity parameter as in window_resizer.
If a number is entered before the command, such as 20<c-w><c-l>, the window will be moved by 20 * window_velocity.
The window can only be moved as far as it is visible on the screen. Therefore, excessive movement will cause the window to stop at the edge of the screen. If you are using multiple displays, the movement range is determined by the combined resolution of all displays.
See Also
<move_window_up>
Moves the selected widow to the up.
The amount of window movement is based on the window_velocity parameter as in window_resizer.
If a number is entered before the command, such as 20<c-w><c-k>, the window will be moved by 20 * window_velocity.
The window can only be moved as far as it is visible on the screen. Therefore, excessive movement will cause the window to stop at the edge of the screen. If you are using multiple displays, the movement range is determined by the combined resolution of all displays.
See Also
<move_window_down>
Moves the selected widow to the down.
The amount of window movement is based on the window_velocity parameter as in window_resizer.
If a number is entered before the command, such as 20<c-w><c-j>, the window will be moved by 20 * window_velocity.
The window can only be moved as far as it is visible on the screen. Therefore, excessive movement will cause the window to stop at the edge of the screen. If you are using multiple displays, the movement range is determined by the combined resolution of all displays.
See Also
<maximize_current_window>
Maximize the current window.
See Also
<minimize_current_window>
Minimize the current window.
See Also
<resize_window_width>
Set the width of a window. You have to pass the pixel value as an argument using the command line.
See Also
<increase_window_width>
Increase the width of a window.
See Also
<decrease_window_width>
Decrease the width of a window.
See Also
<resize_window_height>
Set the height of a window. You have to pass the pixel value as an argument using the command line.
See Also
<increase_window_height>
Increase the height of a window.
See Also
<decrease_window_height>
Decrease the height of a window.
See Also
<arrange_windows>
Arrange windows with tile style.
<exchange_window_with_nearest>
Exchange a window with the nearest window.
<rotate_windows>
Rotate windows in the current monitor.
<rotate_windows_in_reverse>
Rotate windows in the current monitor in reverse.
<snap_current_window_to_left>
Snap the current window to the left.
<snap_current_window_to_right>
Snap the current window to the right.
<snap_current_window_to_top>
Snap the current window to the top.
<snap_current_window_to_bottom>
Snap the current window to the bottom.
<open_new_window>
Open a new window.
<reload_current_window>
Reload the current window.
<open_new_window_with_hsplit>
Open a new window with a horizontal split.
<open_new_window_with_vsplit>
Open a new window with a vertical split.
<close_current_window>
Close the current window.
Process
<help>
This function is called from the virtual command line as a command and opens the document page matching the arguments. The arguments can be function names, option names, parameter names, or predefined tags.
Examples
" Execute from the virtual command line
:help easyclick      " Function name
:help uiacachebuild  " Option name
:help gridmove_size  " Parameter name
:help usage          " Predefined tag
<execute>
Open file with the associated application. This is a wrapper for the famous Windows API, ShellExecute, which behaves the same as double-clicking in Explorer. Therefore, you can open any format files and URLs. For example, :e ~/.vimrc or :e https://www.google.com. If there is no argument, it will open .vindrc loaded at initialization.
<exit>
Exit win-vind.
<sleep>
Sleep win-vind for N seconds.
As the same as Vim, this command is called with commands of the command mode or some bindings.
The duration of time to sleep is specified by the arguments of commands (e.g., :sleep 10) or the prefix number of bindings (e.g., 10gs), as shown in the below examples.
When m is included, sleep for N milliseconds.
The default is one seconds.
Example for command line
:sleep       " sleep for one second
:sleep 5     " sleep for five seconds
:sleep 100m  " sleep for 100 milliseconds
Example for .vindrc
map <ctrl-1> :sleep 5<cr><easyclick> " Launch easyclick after 5 seconds.
<start_external>
Start an external application. This environment variable is dependent on the application specified in the shell option. By appending ; at the end, it keeps the console window without closing immediately. If the explorer is the foreground window, the current directory of a terminal will be that directory.
<start_shell>
Start a terminal. If the explorer is the foreground window, the current directory of a terminal will be that directory.
Vim Emulation
<to_insert_BOL>
Vim Emulation: I
Insert to begin of line.
<to_insert_EOL>
Vim Emulation: A
Append end of line.
<to_insert_append>
Vim Emulation: a
Append after a caret.
<to_insert_nlabove>
Vim Emulation: O
Begin new line above a caret.
<to_insert_nlbelow>
Vim Emulation: o
Begin new line below a caret.
<move_caret_left>
Vim Emulation: h
Move the caret to left.
<move_caret_down>
Vim Emulation: j
Move the caret down.
<move_caret_up>
Vim Emulation: k
Move the caret up.
<move_caret_right>
Vim Emulation: l
Move the caret to right.
<move_fwd_word>
Vim Emulation: w
Move words forward for normal mode.
It performs word-motion using an algorithm that is completely identical to Vim. However, it is not available in visual mode, since the text is selected and copied once and retrieved via the clipboard for text parsing. Instead, you can move_fwd_word_simple for visual mode, which is faster and simpler (of course, it is also available for other modes)
The iskeyword option is fixed to the default value of Vim in Windows and cannot change it currently.
There is an option charbreak to set the criteria for considering a Unicode character as a single character.
<move_fwd_word_simple>
Vim Emulation: w
Move words forward fast.
<move_bck_word>
Vim Emulation: b
Move words backward for normal mode.
It performs word-motion using an algorithm that is completely identical to Vim. However, it is not available in visual mode, since the text is selected and copied once and retrieved via the clipboard for text parsing. Instead, you can move_bck_word_simple for visual mode, which is faster and simpler (of course, it is also available for other modes)
The iskeyword option is fixed to the default value of Vim in Windows and cannot change it currently.
There is an option charbreak to set the criteria for considering a Unicode character as a single character.
<move_bck_word_simple>
Vim Emulation: b
Move words backward fast.
<move_fwd_bigword>
Vim Emulation: W
Move WORDS forward.
It performs WORD-motion using an algorithm that is completely identical to Vim. However, it is not available in visual mode, since the text is selected and copied once and retrieved via the clipboard for text parsing. Instead, you can move_fwd_word_simple for visual mode, which is faster and simpler (of course, it is also available for other modes)
The iskeyword option is fixed to the default value of Vim in Windows and cannot change it currently.
There is an option charbreak to set the criteria for considering a Unicode character as a single character.
<move_bck_bigword>
Vim Emulation: B
Move WORDS backward.
It performs WORD-motion using an algorithm that is completely identical to Vim. However, it is not available in visual mode, since the text is selected and copied once and retrieved via the clipboard for text parsing. Instead, you can move_bck_word_simple for visual mode, which is faster and simpler (of course, it is also available for other modes)
The iskeyword option is fixed to the default value of Vim in Windows and cannot change it currently.
There is an option charbreak to set the criteria for considering a Unicode character as a single character.
<move_end_word>
Vim Emulation: e
Forward to the end of words.
It performs word-motion using an algorithm that is completely identical to Vim. However, it is not available in visual mode, since the text is selected and copied once and retrieved via the clipboard for text parsing.
The iskeyword option is fixed to the default value of Vim in Windows and cannot change it currently.
There is an option charbreak to set the criteria for considering a Unicode character as a single character.
<move_end_bigword>
Vim Emulation: E
Forward to the end of WORDS.
It performs WORD-motion using an algorithm that is completely identical to Vim. However, it is not available in visual mode, since the text is selected and copied once and retrieved via the clipboard for text parsing.
The iskeyword option is fixed to the default value of Vim in Windows and cannot change it currently.
There is an option charbreak to set the criteria for considering a Unicode character as a single character.
<move_bckend_word>
Vim Emulation: ge
Backward to the end of words.
It performs word-motion using an algorithm that is completely identical to Vim. However, it is not available in visual mode, since the text is selected and copied once and retrieved via the clipboard for text parsing.
The iskeyword option is fixed to the default value of Vim in Windows and cannot change it currently.
There is an option charbreak to set the criteria for considering a Unicode character as a single character.
<move_bckend_bigword>
Vim Emulation: gE
Backward to the end of WORDS.
It performs WORD-motion using an algorithm that is completely identical to Vim. However, it is not available in visual mode, since the text is selected and copied once and retrieved via the clipboard for text parsing.
The iskeyword option is fixed to the default value of Vim in Windows and cannot change it currently.
There is an option charbreak to set the criteria for considering a Unicode character as a single character.
<jump_caret_to_BOF>
Vim Emulation: gg
Jump the caret to BOF.
<jump_caret_to_BOL>
Vim Emulation: 0
Jump the caret to begin of line.
<jump_caret_to_EOF>
Vim Emulation: G
Jump the caret to EOF.
<jump_caret_to_EOL>
Vim Emulation: $
Jump the caret to end of line.
<change_char>
Vim Emulation: s
Change Characters.
<change_highlight_text>
Vim Emulation: c, s, S
Change highlighted texts.
<change_line>
Vim Emulation: cc, S
Change Lines.
<change_until_EOL>
Vim Emulation: C
Change until EOL.
<change_with_motion>
Vim Emulation: c{motion}
Change texts with motion.
<delete_after>
Vim Emulation: x
Delete chars after the caret.
<delete_before>
Vim Emulation: X
Delete chars before the caret.
<delete_highlight_text>
Vim Emulation: d, x, X
Delete highlighted texts.
<delete_line>
Vim Emulation: dd
Delete lines.
<delete_line_until_EOL>
Vim Emulation: D
Delete texts until end of line.
<delete_with_motion>
Vim Emulation: d{motion}
Delete texts with motion.
<join_next_line>
Vim Emulation: J
Join a next line.
<put_after>
Vim Emulation: p
Put texts after the caret.
<put_before>
Vim Emulation: P
Put texts before the caret.
<repeat_last_change>
Vim Emulation: .
Repeat last simple change.
<replace_char>
Vim Emulation: r
Replace a char.
<replace_sequence>
Vim Emulation: R
Replace Mode.
<switch_char_case>
Vim Emulation: ~
Switch char case.
<yank_highlight_text>
Vim Emulation: y
Yank highlighted texts.
<yank_line>
Vim Emulation: yy, Y
Yank lines.
<yank_with_motion>
Vim Emulation: y{motion}
Yank lines with motion.
Hotkey
<backward_ui_navigation>
Backward UI Navigation.
<decide_focused_ui_object>
Decide a focused UI object.
<forward_ui_navigation>
Forward UI Navigation.
<goto_next_page>
Forward to the next page.
<goto_prev_page>
Go backward to the previous page.
<hotkey_backspace>
Backspace.
<hotkey_copy>
Copy.
<hotkey_cut>
Cut.
<hotkey_delete>
Delete.
<hotkey_paste>
Paste.
<open>
Open another file.
<open_startmenu>
Open the Start Menu.
<redo>
Redo.
<save>
Save the current file.
<search_pattern>
Search Pattern.
<select_all>
Select all.
<start_explorer>
Start Explorer.
<undo>
Undo.
Virtual Desktop
<close_current_vdesktop>
Close a current virtual desktop.
<create_new_vdesktop>
Create a new virtual desktop.
<switch_to_left_vdesktop>
Switch to a left virtual desktop.
<switch_to_right_vdesktop>
Switch to a right virtual desktop.
<taskview>
Task View.
Tab
<close_current_tab>
Close a current tab.
<open_new_tab>
Open a new tab.
<switch_to_left_tab>
Switch to a left tab.
<switch_to_right_tab>
Switch to a right tab.
File
<makedir>
Create a directory. If you call it with a relative path such as :mkdir foo, it creates it in the explorer directory. If no explorer is found, it creates it in ~/Desktop/foo. If you call it with an absolute path like :mkdir C:/Users/You/Desktop/bar, it will create a directory along the path recursively.